Once your AI CBO is live, everything it does on your behalf flows into one place: agentgrow.io/user/dashboard. This is your command center — a live view of your agent's health, output, and business impact. You do not need to check Telegram every hour or dig through social media apps to know what is happening. The dashboard surfaces exactly what matters, when it matters.
This walkthrough covers every section of the dashboard in the order you will encounter them, from the top-level status indicator down to ROI event tracking.
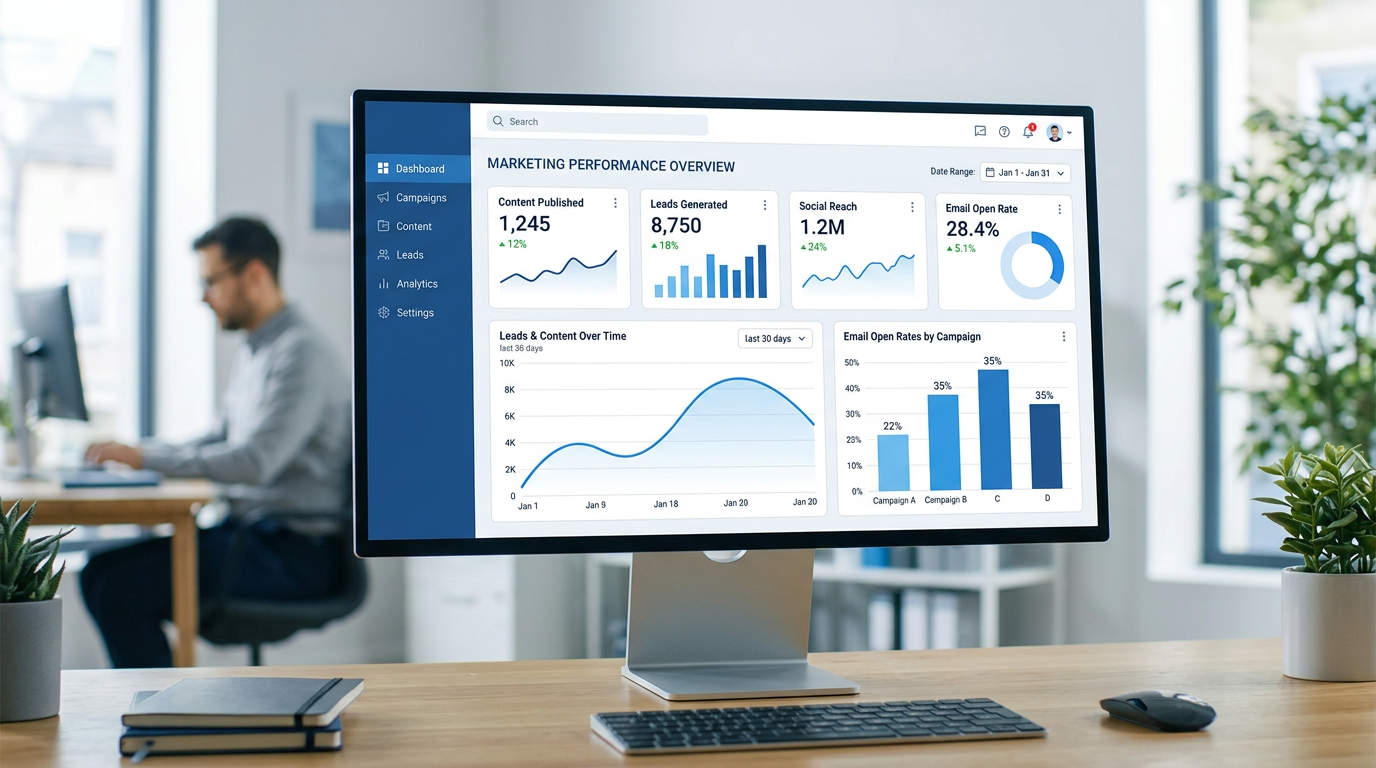
1. Overview — Your Command Center
The dashboard opens with a full picture of your agent's current state. The layout is intentionally top-heavy with status information: the most urgent things (agent health, pending approvals) appear before the historical data (activity feed, pipeline). If anything needs your attention right now, you will see it within the first scroll.
Navigation is handled through a persistent sidebar (desktop) or bottom tab bar (mobile). The sections are: Dashboard, Prospects, Calendar, Assets, and Integrations. Everything discussed in this post lives under the Dashboard tab.
2. Agent Status
Agent Health at a Glance
The status panel shows three signals in a compact card at the top of the page:
- Heartbeat indicator — green pulse = agent is running and responsive. Amber = agent has not checked in within the expected window. Red = agent is offline.
- Current task — a short description of what the agent is doing right now (e.g. "Writing blog post: 7 Low-GI Indian Breakfasts").
- Last active — timestamp of the most recent agent activity, displayed as relative time ("3 minutes ago").
The heartbeat is reported by the agent at the end of every task. If you see an amber indicator, it usually means the agent is mid-task on something long-running (a research or competitor analysis pass can take 10–15 minutes). If the indicator stays amber for more than 30 minutes, reach out via Telegram — the agent will respond immediately.
The "current task" field updates per module. If your agent is working on blog content, it shows the post title in progress. If it is doing SEO analysis, it shows the keyword cluster being researched. This level of transparency is intentional: you should always know what your agent is working on, not just that it is "busy".
3. KPI Goals
Below the agent status card you will find the KPI Goals panel. This is the most customisable part of the dashboard. You configure up to five goals that reflect the outcomes you care most about — not just activity metrics.
Typical Goals for a B2B SaaS Client
Each KPI displays three things: the current value, your target for the period, and a progress bar that fills left-to-right as you approach the goal. The trend arrow (up, down, or flat) compares this period against the previous one of the same length.
Below the progress bar is a 30-day sparkline — a miniature line chart showing daily values for the metric. Sparklines are particularly useful for spotting patterns: a flat sparkline on leads might indicate the blog content is not yet indexed, while a sharp uptick on impressions often correlates with a post that hit a high-traffic keyword.
To configure your KPI goals, go to the Integrations page and scroll to the Goals section. You choose the metric type (content, leads, social, SEO, or custom), set a target number, and specify the reset period (weekly or monthly).
4. This Week Stats
Directly below the KPI panel is a row of three quick-stat cards covering the current calendar week:
- Content published — total pieces pushed live (blog posts, social captions, LinkedIn articles) since Monday
- Leads captured — form submissions that arrived via your lead capture integration this week
- Social posts — count of posts published across all connected platforms (Facebook, Instagram, LinkedIn counted separately)
These three numbers reset every Monday at midnight. They are intentionally simple: a weekly snapshot you can read in three seconds. For deeper analysis, the Activity Feed (section 6) gives you the full history with per-action detail.
If a number looks lower than expected, click it — you will jump directly to the filtered activity feed showing only that category of action for the current week.
5. Approval Queue
The Approval Queue is where your agent asks for your sign-off before publishing. Nothing in the queue has gone live yet. This section is deliberately positioned high on the page — if you have pending items, you will see them before scrolling to analytics.
Review Before Anything Goes Live
Each card in the queue shows:
- Content type (blog post, social caption, LinkedIn article)
- Title or first 120 characters of the content
- Which platform it is intended for
- When the agent created it
Clicking a card opens the full content preview. You have three options:
- Approve — the agent publishes immediately (or at the scheduled time, if a schedule is configured)
- Reject with note — the agent receives your feedback and produces a revised version within a few hours
- Discard — removes the item from the queue without requesting a revision
You can also approve and reject directly from Telegram. When the agent submits content for review, it sends you a message in your Telegram group with the title and a preview snippet. Reply "approve" or send a note and the agent handles it. Most clients find that Telegram approval is faster for quick decisions — the dashboard is better for reading long-form content before sign-off.
6. Activity Feed
The Activity Feed is the complete chronological log of everything your agent has done. Unlike the This Week Stats summary, the feed goes back as far as your subscription has been active — you can scroll back to the first day your agent was live and see exactly what it published.
Each entry in the feed shows:
- Action type with a colour-coded icon (blog = purple, social = sky blue, leads = lime, SEO = amber, email = zinc)
- Title or brief description of the action
- Timestamp (relative for recent items, absolute date for older ones)
- A "View" link that opens the published content or the relevant detail (e.g. the lead record, the SEO report)
The feed is filterable by category using the tabs above it: All, Blog, Social, Leads, SEO, Email. If you want to see all the blog posts published in February, click Blog and scroll — you will find every post with its publication date and a direct link to the live URL.
The activity feed is also useful for auditing agent behaviour. If something was published that you did not expect, the feed shows the exact timestamp and context. If a lead arrived but was not in the CRM, the Leads tab will confirm whether it was captured and what data was recorded.
7. Prospect Pipeline
The Prospect Pipeline section gives you a funnel visualisation of your leads by stage. This is powered by the CRM module (Growth and Enterprise plans), which your agent maintains on your behalf.
Default Lead Stages
- New — just captured, not yet contacted
- Contacted — agent has sent introduction email or message
- Engaged — lead replied or showed measurable interest
- Proposal — a proposal or demo has been shared
- Closed — won or lost (tracked separately in the funnel totals)
The funnel on the dashboard is a read-only summary: it shows how many prospects are in each stage right now and how that compares to last week (small delta badge on each stage). For full CRM operations — moving a lead between stages, adding interaction notes, or exporting the pipeline — go to the Prospects tab in the sidebar.
If you have the Growth or Enterprise plan, your agent automatically moves leads through the pipeline based on email interactions. A lead who replies to an outreach email is moved from Contacted to Engaged without you touching the CRM. You can always override a stage manually from the Prospects tab.
Starter plan clients see the pipeline section with a prompt to upgrade. If you are on Starter and capture leads via a form integration, those leads still appear under the Leads tab of the activity feed — they are just not tracked with stage progression.
8. ROI Events
ROI Events are the most intentional part of the dashboard — and the most underused by new clients. The idea is straightforward: not every business outcome shows up in a content or lead metric. A new client signing a contract, a speaking invitation that came through the blog, a partnership that started with a LinkedIn post — these are real returns on the agent's work, and they deserve to be tracked.
You log ROI events manually (or ask your agent to log them for you via Telegram). Each event has:
- Type — client signed, revenue generated, partnership, media mention, cost saved, other
- Value — optional monetary amount (INR or USD)
- Source — which agent activity contributed (a specific blog post URL, a social campaign, an outreach email)
- Date — when the outcome occurred
- Notes — free text for context
Over time, the ROI Events panel builds a cumulative picture of agent-attributed business value. If your plan is up for renewal and you are evaluating whether AgentGrow is worth it, this is the section to open. Every linked outcome is traceable back to a specific action the agent took.
9. Tips for Getting the Most Out of Your Dashboard
- Check the Approval Queue daily, not hourly. Content submitted for review does not expire — a daily review session is more efficient than interrupting your workflow repeatedly.
- Configure your KPI goals before the first full month is complete. Once you have 30 days of data, the sparklines become genuinely useful for spotting trends. Goals set too late miss the early baseline.
- Use the Activity Feed filter when reviewing a specific module. If you just configured the SEO Analyst integration, click the SEO tab in the feed to see exactly what it has done since setup.
- Log ROI events the same week they happen. Memory fades. A quick Telegram message to your agent takes 20 seconds and keeps the historical record accurate.
- Reject with a note rather than discarding content. The agent uses your rejection notes to improve future output. A discard gives it no signal. A rejection note like "too technical — write for decision-makers not engineers" immediately refines the agent's understanding of your audience.
- If the pipeline funnel looks stale, check the CRM directly from the Prospects tab. The dashboard funnel refreshes every few minutes, but a manual stage change made by you in the CRM takes one page reload to reflect on the dashboard.
- Share dashboard access with your co-founder or marketing lead. The client dashboard supports a single login, but you can share your credentials with a trusted team member. A dedicated multi-user access system is on the roadmap.
What the Dashboard Does Not Replace
The dashboard is a summary layer. It consolidates signals from your agent's activity into a single view, but the underlying actions happen on the platforms your agent manages. Blog posts live on your GitHub Pages site. Social posts are on Facebook, Instagram, and LinkedIn. Leads are in the PostgreSQL CRM. The dashboard surfaces all of this so you do not have to visit five platforms — but the primary record is always the source platform.
If you ever need raw data exports (for your own BI tools, for a board report, or for an audit), reach out to support. CSV exports for the activity feed and CRM are available on request.
For feature requests or questions about the dashboard, the fastest channel is your Telegram group with the agent. It can answer questions about your own data, log events, and relay requests to the AgentGrow team.